How to use Tags and Categories on your Squarespace blog
/Have you ever read a blog post by someone and then a few weeks later you wanted to go back and read it again so you go to their blog and try to find it and after scrolling for like 10 minutes you give up and curse yourself for not bookmarking the post when you read it the first time?
DANG that was quite the long winded sentence! Deep breath everyone.
The numero uno reason I keep my blog so organized and search friendly is because I LOATHE when I can't find something I'm looking for on someone else's website. The whole point of my blog is to feature clients and provide rich educational content that people can find easily.
How do I do it? Tags and Categories baby.
Keep in mind that tags and categories are not unique to Squarespace. From what I know, you can categorize and tag blog posts on other platforms as well. So if for some odd reason you aren't using Squarespace, don't worry, you can still rock out your organization on your blog to make it super simple for your readers to find your amazing content.
Why organization is important
Being the type A, introvert, only child that I am, this question seems silly to me. Of COURSE organization is important. I like to know where my keys are. I need to have a place for my lippy, my pens, my coats, my this and that. I like to be efficient and I feel like time spent looking around for something that should be a certain place and it's not, is simply a waste of time.
Personal feelings aside, if you are blogging, and if you care about readers staying on your website for more than the 2 minutes it takes them to read the post they clicked over to read, organization should be important to you too.
Having a strategy and process in place to organize your content will ONLY increase the potential for readers to stay around longer, get more awesome information that you worked HARD to put together and fall more in love with you.
There is no downside. I promise.
categories & tags
Categories
When you start to think about blog organization, categories is where you need to start. No one blogger only blogs about ONE subject. Many times bloggers spend time discussing a few different topics and featuring various types of posts. While it's optimal to vary up your content, you don't want to make it too broad because your readers will never know what to expect from you.
My recommendation when thinking about your blogging and your blogging strategy is to keep it to about ten categories and no more. Even that is a little much, but if you need that much wiggle room, keep it to ten overarching "bigger" categories and then you can further delineate with tags.
For example, the main categories for my own blogging are the following:
Weddings, Couples, Families, For Photographers, Personal, Marriage, Travel, With this Ring
In all reality, I could pair this list down and might do a little re-categorization at some point in the near future, but for now, this system works well for me.
tags
Tags are a way for you to get really specific about what a post is about. Tags will also be seen on the back end of your site and can help with SEO efforts.
I recommend thinking about tags as sub-categories for your main categories in addition to just adding info for SEO.
The easiest way is for me to give you a couple of examples. YAY for examples!
Example 1: A blog post featuring a family session taken in NJ on the Princeton college campus and there are three kids in the family
Category: Family
Tags: Family of five, family of five photography, NJ family photographer, NJ Family photography, Princeton photography, Princeton NJ Family photography, April 2016
Example 2: A blog post featuring a wedding that took place at Sterlingbrook Farm & Events and has a barn, rustic feel with navy and blush color theme
Category: Wedding
Tags: Barn Wedding, Rustic Wedding, Sterlingbrook Farm & Events, Blush, Navy, NJ Wedding, NJ Wedding Photographer, April 2016
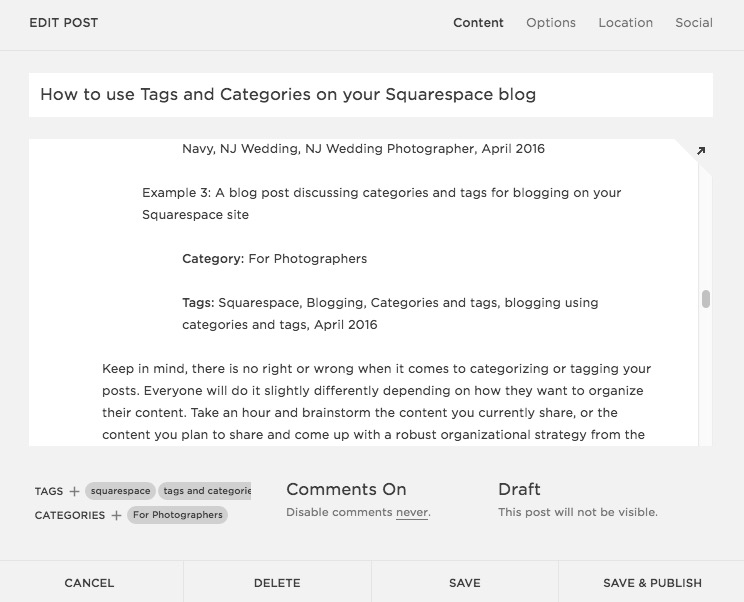
Example 3: A blog post discussing categories and tags for blogging on your Squarespace site
Category: For Photographers
Tags: Squarespace, Blogging, Categories and tags, blogging using categories and tags, April 2016
Keep in mind, there is no right or wrong when it comes to categorizing or tagging your posts. Everyone will do it slightly differently depending on how they want to organize their content. Take an hour and brainstorm the content you currently share, or the content you plan to share and come up with a robust organizational strategy from the beginning. I promise, you won't regret it!
Potential use
Ok now that you have everything organized, what's next?
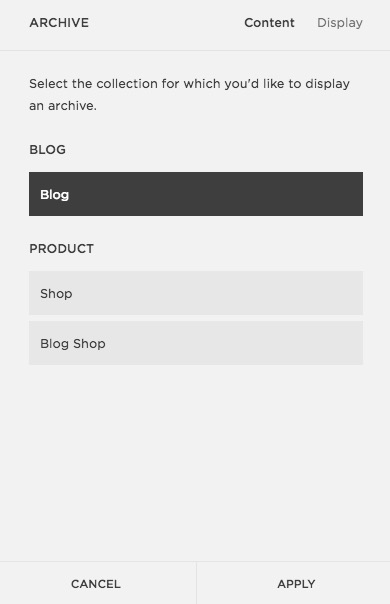
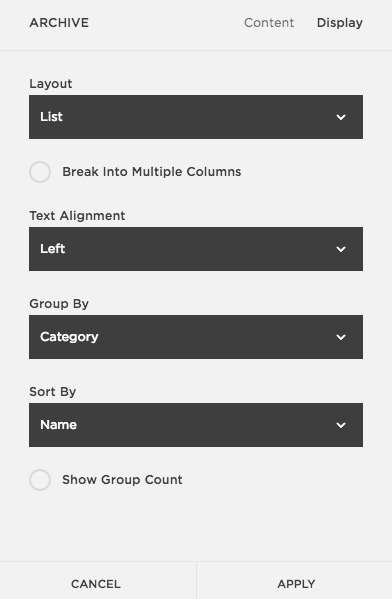
Archive page
The archive page is a perfect example of how to present your older content in a super organized way. You may have wondered why I included a month and year in my tags above. This has everything to do with my archive page. I want to display my content based on when it was posted by month and year. Utilizing a summary block and tags I can do this easily on my archive page.
If you wanted to organize your archive page by category you could do that as well. The options are endless.
Here is my ARCHIVE PAGE for reference.
Summary Block
You should know by now how much I love summary blocks and their many uses. I've got them all over my site. On each blog post, in my sidebar and on my archive page. I find my organization works best for this purpose. At the end of each blog post I can specify exactly what I want to include in the summary block at the bottom based on how I categorized or tagged. For example, at the end of a blog post featuring a family of five, I can include a summary block at the bottom that not only shows family blog posts, but family of five blog posts. Readers can get MORE of what they are already looking at. Love it.
Category pages with Summary Blocks
In addition to my archive pages, I also make individual pages for each one of my main categories and include a summary block on each page. That way I can link images that I create (in my sidebar and archive page) to the page including a thumbnails of posts as opposed to linking to a category alone and then having the reader scroll through all of the posts. This might make more sense in a video. Good thing I created one!
These are my category pages: Weddings, Family, Tips for Brides, Blogging, Squarespace, Photo Tips, Business
Sidebar
If you aren't into creating images that link to categories or creating whole entire pages for each category and including a summary block, you can use the category block to include a dropdown in your sidebar. Its an option. Not my favorite...but it's there if it works for you!
Navigation Bar
You can also add a link in your navigation bar that simply links to a category of posts and then when someone clicks on it they will be taken to a scrolling list of posts within that category. I see quite a few people do this and while I appreciate the effort, it still is not easy to find specific posts especially if you only have a few categories. Your reader could end only seeing your most recent work, not finding what they are looking for specifically etc...
Other important info
How? Where?
Categories and tags are added at the end of every blog post under the Settings screen.
If you ever want to delete any of your tags and categories you can do that under the gear screen on your BLOG.
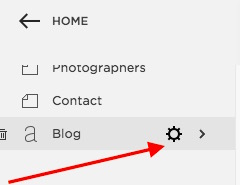
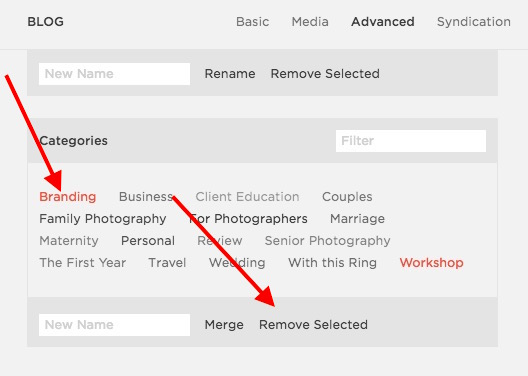
Then select Advanced in the top left corner. You will see all the tags you have ever used populate (watch out the list could be LONG) and also all of the categories you have ever used.

Simply click on whatever tag or category you want to delete and it will turn red and an option at the bottom will pop up that says "remove selected".
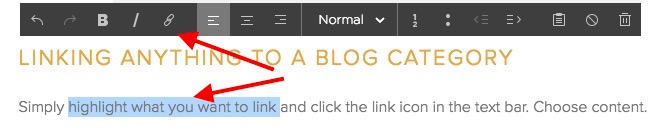
Linking anything to a blog category
Simply highlight what you want to link and click the link icon in the text bar. Choose content.
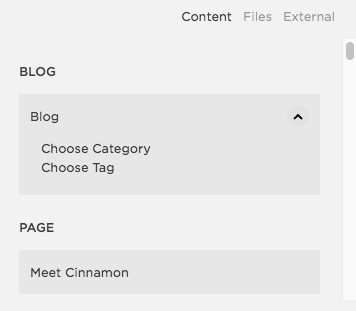
Select blog, and then in the dropdown, select Category. A list of your categories will pop up. Select the one you want and bada boom, bada bing, you are in business.
If you want to link an IMAGE to a blog category you do the exact same as above except you choose the "click through URL" option in the image block. Then choose content, blog, category.
ALRIGHT! You should be set now when it comes to categories and tags and how to use them to organize your content on your site to make it super simple for readers to access your older or previous content.
And by all means if you want nothing to do with categories and tags, by all means at least offer a SEARCH option SOMEWHERE on your site or blog so readers can at least search for content they may be looking for. I beg of you! ;-)
Happy blogging!
Looking for more info on all things photography, business and blogging? Come join me at my new educational site: cinnamonwolfe.co!
Click photo below and join in the fun!