17hats // An Intro

Yesterday I provided a list of the top 5 resources for new photographers and 17hats was one of those tools. Since 17hats is a relatively new online client management system, I wanted to begin a small series on the features that are included in this system, how I utilize the system for my photography business and some how to posts to help make learning the system easier. Even though "out of the box" 17hats is a pretty intuitive system to use, real world examples never hurt right? Right! 

intro to 17hats client mgmt software cinnamon wolfe photography

Keep in mind, this post is not intended to be an in depth how to for each of the items in the system, rather a basic overview of what each of these features does and what sort of info is included. 

Overview

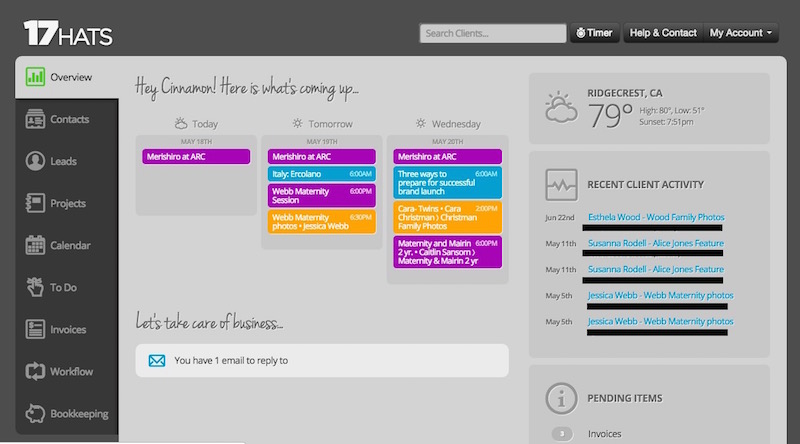
Once you sign up for the trial or for an account you will be taken to the Overview screen which acts like a dashboard. This is where you can get some quick information about what's coming up on your calendar, what is outstanding, emails that need to be responded to etc...

17hats Overview Page

Contacts

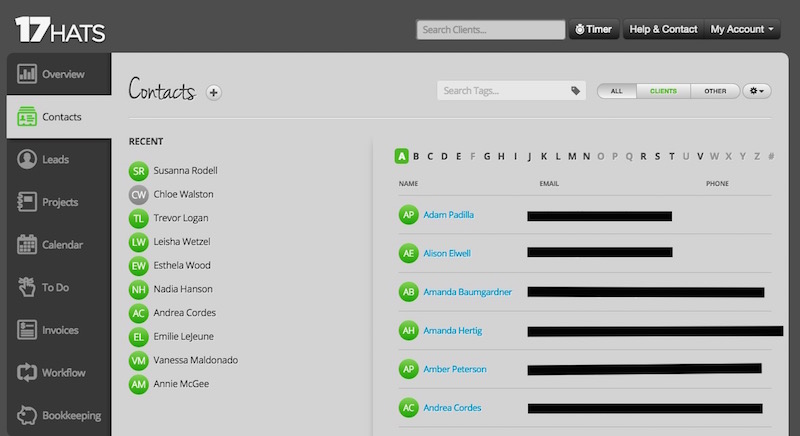
This section is pretty self explanatory. Any contacts you enter into the system are kept here. They are listed alphabetically by first name. I really like how the page is laid out. It takes one/two clicks to get to the client I need to get to. Easy Peasy. 

17hats Contact page

Leads

I haven't used this area very much but when you enter a contact, you can label them as a hot or cold lead if they haven't booked yet. This way you can follow up with them etc...Handy. 

17 hats Leads page

Projects

Everything in 17hats is based on project. A session for me would be a project. If a client re-books another session, I just add another project under their name. You can keep all documents/emails/invoices/notes etc...related to each project together so it makes finding things very easy. I love how organized and easy it is to find whatever I need to find. 

17 hats projects page

Calendar

You can see all of your projects/to do lists etc...in calendar view. You can have multiple different calendars and you can also sync to other calendars as well. I sync to my shared calendar with Paul so I can see what he has going on and he can see what I'm up too as well. Love it! 

17 hats Calendar

To Do

You can add to do items under clients projects or you can add them here. I have added blog posts as to do's so I can see them in a different color on the calendar. There are many different uses for the to do lists, this is just one example. 

17 hats to do list

Invoices

A one stop shop to see all of your paid and outstanding invoices. Everything is clickable as well so you can get to a client from this screen etc...

17 hats Invoice page

Workflow

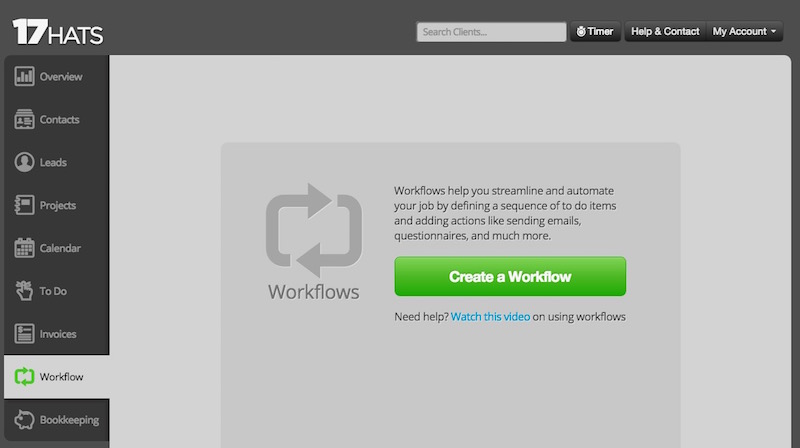
Workflows is a relatively new feature and I haven't delved much into it since all of my workflows will be changing once we move. However, I have heard good things from others and it can be set up to auto send emails, contracts etc...so it can help you save tons of time on the backend making sure all of the little items don't get missed! 

17 hats workflow

Bookkeeping

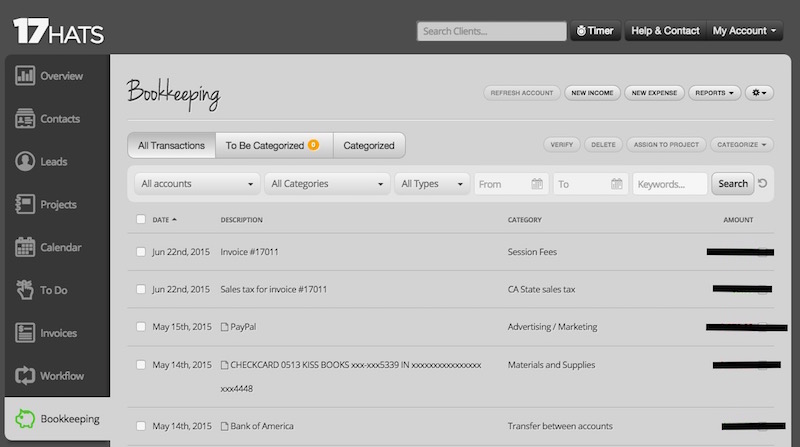
I love this feature! You can sync up your business bank account and categorize all of the transactions and then pull reports! This can be a little more tricky to set up and to make sure you are categorizing everything appropriately can be a little daunting. I might go into this more in a future blog post. Stay tuned! 

17 hats bookkeeping

And there you have it! A very basic intro to the inner workings of 17hats. Stay tuned for more posts in this series of how you can utilize 17hats for your business!! 

All opinions expressed in this post are my own and I was not compensated by 17hats for this. If you would like to try them out for yourself click HERE

Three ways to prepare for a successful brand launch

My branding process officially begins on May 25th. That's next week people!! The time has flown by these past few months and I am so ready to get started! Working with a professional on this project has been so eye opening and life changing. I can not stress the importance of hiring a professional to help you take on tasks that you do not specialize in. It will make all the difference in the world as your proceed with your project. 

I originally contacted Lauren in January and our process began soon after that. While the entire branding process will technically take place in the two weeks following May 25th, there is much work to be done before that time frame happens. Lauren provided me with homework to do in preparation for this launch and that homework has made all the difference in how successful this brand launch will be. 

3 ways to prepare for successful brand launch cinnamon wolfe photography

Identify your target client

I could write posts and posts about identifying your target client and how important that is to a small business owner. (Stay tuned for more on that subject!) Taking the time to really sit down and think about who your services will benefit, what type of client you want to utilize your services and what sorts of things will attract them is monumental to implementing a successful brand. Prior to beginning my branding process this was not something I really gave much thought. Maybe I knew I wanted to work with families and brides but what KIND of families and brides? Building a successful business is not dependent on getting any client who comes your way, it's getting the right kinds of clients who are looking for what you have to offer, are interested in how you offer it and will essentially be a brand ambassador for you. 

Action item: Take time to think about your favorite clients so far and why it all "worked so well" with them? Are they your ideal? If every client was like them, what would that look like? What stores does your ideal client shop at? What music do they listen too? What character qualities do they have? Make a list of all the things that make up your ideal client and hand over to your designer. 

Invest in yourself

If you wait until the week before you start your branding project to begin working on homework or doing prep work, you might not be all that invested in making your brand a success. You have likely invested a relatively large sum with a designer but their design will only be as good as the amount of time you put into it as well. Refine your business plan or create one if you haven't yet. Identify your ideal client. Find your "why" if you haven't already. Read some books on branding and business. Talk with people you trust to help you fine tune some decisions you might have to make about services you offer. 

I had around four months to spend getting ready for this branding process to begin. In reality a few more months probably would have been fine. Spending the time to really delve into my business and what I want to accomplish with my business will only benefit Lauren and her design because she will have an incredibly strong foundation on which to design on. 

Action item: Start on any homework or prep work right away. Make lists. Read books. Talk it out with those you trust. Ask yourself the hard questions and don't be afraid of the answers! 

Fine tune your workflow

This has been the hardest for me. I love organization and workflows but I also like to be a little bit flexible (and I do mean a little bit!). With any process or project there are workarounds, exceptions, one offs and "hinge" decisions galore. (Hinge decisions are those decisions that hinge on something else getting done and essentially prevent the project from moving forward.) Creating workflows to ensure every step of your process gets completed for every client can be...honestly...a little snoozefest. Once you sit down and start to write out every single thing you do for every single client, it seems like there are a million tiny tasks that are boring, repetitive and just not all that "sexy". Add this to the fact that I know there will be exceptions to my workflow process and it just makes the task of fine tuning everything all that more unappealing.

However, understanding your workflow and how it all fits with your client experience is imperative to the branding process. As I've mentioned before, your brand is not just your logo, it is the piece of YOU that is woven in between every intricate layer of your business. From the type that you use in blog posts, color choices, response time for emails, follow up process to gifts you provide...your brand is embedded into every single step. If you don't know what those steps are then your designer can't help you make your brand experience exactly what it needs to be the most: cohesive. 

Action item: document your entire workflow process for each type of client you serve and make sure to make tweaks along the way if things change. Give yourself a break if exceptions happen but do everything you can to make sure your entire process from start to finish fits in with your overarching mission and goal. 

Have you launched a brand before? What other steps did you find that were imperative to your success!