Understanding Depth of Field

Understanding Depth of Field | Cinnamon Wolfe Photography | NJ Wedding Photographer

If you are anything like me, understanding depth of field (DOF) was one of the biggest hurdles you had to overcome when learning the technical aspects of photography. I would read explanations online, see links to calculators, hear it described as “shallow” or “deep” and couldn’t make sense of it all.

One day it just clicked. I’m not sure where or when, but I have a much better grasp on it now.  I love using that knowledge to positively impact my own personal art as well as the art I create for my clients. My goal with this article is to explain DOF in a way that will make it “click” for you, if it hasn’t already!

Understanding Depth of Field

Explaining DOF starts with defining certain terms and moves to describing some things that affect DOF.

Definitions:

Focal Plane

distance from the camera at which the sharpest focus is attained

In the photo below, the exact location of the focal plane is obvious.

Understanding Depth of Field | Cinnamon Wolfe Photography | NJ Wedding Photography

Depth of Field 

range of distances on either side of the focal plane that are “acceptably sharp.” (“Acceptably sharp” is where the confusion begins.) Another way to state this would be: the area behind and in front of your focus point that is in focus as well. Even though every photograph is two-dimensional, it portrays a three-dimensional world. The distance between the camera and the subject and the distance behind the subject to the “end” of the photo is the “depth” of the photo. The amount of depth that is in focus is the depth of field.  

In the above photo, the whole “in focus” area is the depth of field.

What affects your DOF?

Aperture:

In my opinion, this has by far has the greatest impact on DOF

Distance from subject

How far you are standing away from what you want to focus on. Although seemingly obvious, it is easy to underestimate the effect of distance on your DOF.

Understanding Depth of Field | Cinnamon Wolfe Photography | NJ Wedding Photography

In each of the photos above, I stood increasingly farther back.  You can easily see the corresponding increasing depth of focus.

(all of the above photos were taken with my Sigma Art 35mm 1.4 at the following settings: f/1.4 | 400 | 1/200)

Focal length

Some research indicates that focal length does not affect DOF, and to an extent I agree.   But for practicality sake focal length does appear to have an effect on DOF so I will briefly discuss that here as well.  

Sensor Size

I believe this has the least impact on DOF, primarily because most photographers don’t routinely switch (alternate) between crop sensor and full frame.  Changes in DOF depend on whether you use a crop or full frame; but if you use only one sensor most of the time, it will not greatly affect your work.

Understanding how aperture affected my DOF was relatively easy for me to grasp. Standing in the same place, using the same lens, with my subject the same distance from me, it was easy to see how much of my image would be in focus if I switched between f/1.4 and f/5.6.  However, changing my distance to subject or throwing a different focal length into the mix left my head spinning.  

Here are some good examples of how changing your distance to subject can affect your DOF.

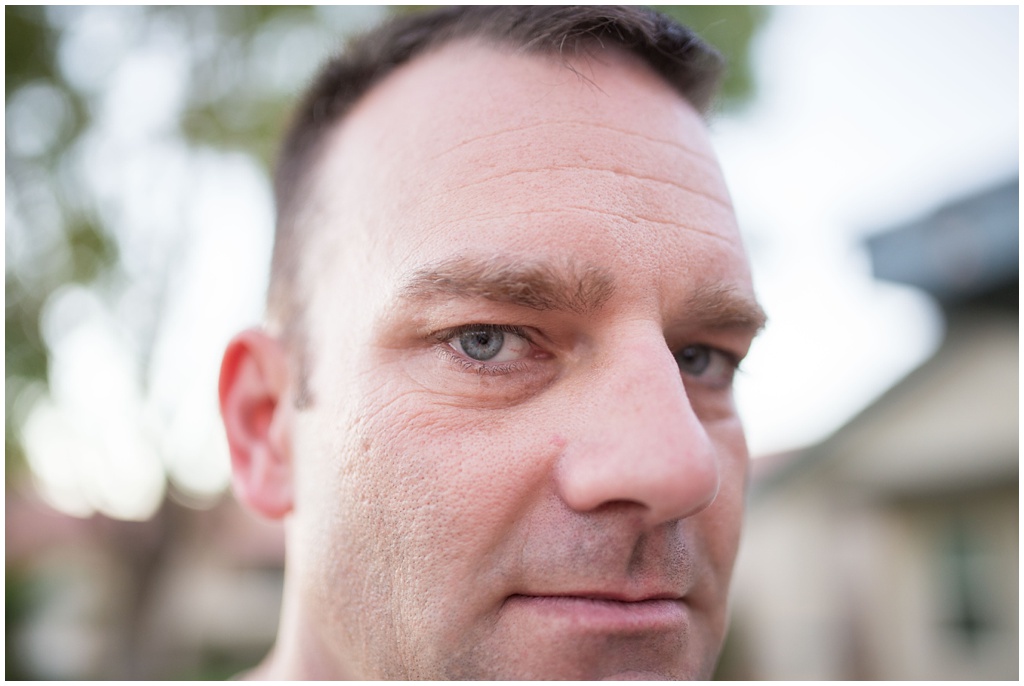
In this first photo (of my handsome, always willing-to-model-for-me husband) I moved in really close and focused on his eye. As you can clearly “see” (pun definitely intended!), his eye is the only thing in focus in this image.  That’s because I was shooting at f/1.4 while standing very close to him. Since my DOF is wafer thin and his face has a lot of “depth,” only his eye is in focus. Everything else in the photo is either in front of or behind that focus point and thus blurred.

Understanding Depth of Field | Cinnamon Wolfe Photography | NJ Wedding Photography

For this second image, I took two steps back and kept my camera settings essentially the same. I focused on his far eye in this image. Notice how more of the image appears in focus. However, since I had him at an angle and was shooting at such a wide aperture, my DOF is still pretty thin.  Because of the angle, his front eye is not sharply focused. Other areas, like his hair and ear and neck/shoulder line, are in focus. Those are all on the same focal plane with his eye. When looking at the photo, however, his face should be the main focus. Because of the varying depths involved and my wide aperture, the image does not appear pleasantly sharp.  If he had stood directly parallel to me, both eyes might have been in focus. If I had increased my DOF by closing my aperture to f/2.5, his whole face might have been in much sharper focus.

Understanding Depth of Field | Cinnamon Wolfe Photography | NJ Wedding Photography

For this final image I took a couple of steps back from my subject. You can readily see that my DOF is much greater at this distance. Almost all of his entire body is in really good shape (er…make that sharp) focus. The rest of the image blurs away beautifully to create a really pleasing separation of subject from background.

Understanding Depth of Field | Cinnamon Wolfe Photography | NJ Wedding Photography

I shot all of these images with my Sigma Art 35mm 1.4 lens at these settings: f/1.4 | 640 | 1/100

If I had taken the same shots, with the same settings, standing in the same places with a 50mm lens or an 85mm lens, the DOF would appear shallower (thinner) for each of the images.

Hopefully these examples have helped you unlock the mystery of DOF and create more of the images you love! 

Necessary tools for a Legit Selfie

I don't care how much it has become a part of our mainstream everyday life, the word "selfie" will probably never sit right with me. But it is what it is, and sometimes you gotta just roll with the punches, right?

Wow, I'm full of cliches today aren't I? 

I had a question come through my inbox the other day and I thought a rainy Wednesday afternoon was the perfect time to tackle the question that runs across every photographer's mind..."how in the world am I supposed to take a photo of myself with this thing?" That wasn't the actual, literal question, but you know I like to be a little dramatic from time to time right? Right. 

how do i take a picture of myself with a dslr? | Northern NJ Wedding Photographer

Taking a picture of yourself with your phone (selfie) is about one hundred times easier than taking a photo of yourself with your DSLR camera (self portrait). But you have a lot of drawbacks- selfie arm being the biggest one. The composition on most phone selfies is the same and because the phone is attached to your hand which is attached to your arm which is only so long, this limits you as well. 

Don't get me wrong, I take plenty of selfies (mostly with Paul) because they are easy and fun and quick. 

Taking a self portrait of yourself can be a much tougher challenge however and it takes a LOT of practice and a lot of patience to achieve a result you are happy with. Hopefully todays post will help you understand the tools you need to pull this off and you can be well on your way to capturing some self portraits that you love. 

how do i take a picture of myself with a dslr? | Northern NJ Wedding Photographer

Necessary Tools

In order to take a self portrait the following tools are helpful:

  • Camera (of course)
  • Tripod
  • Remote 
  • Lightstand (to focus on)
  • ps....the little black square is is the attachment for your camera so it will attach to the tripod...

Depending on where you want to take this self portrait will determine a lot of how this process works. I haven't done an in depth self portrait project (although I would love to) so my practice has usually just been somewhere in my house (or in the front door...great lighting there usually) and the photos are usually pretty close up as I tend to struggle posing my own body in flattering ways when taking a self portrait. 

You don't necessarily HAVE to have a tripod to do this, but it IS extremely helpful. You can just sit the camera on a hard, flat and stable surface instead but that might limit you in how you compose the photo. The point is, something has to hold the camera since you will be on the other side of it. 

A remote is not 100% necessary either as most cameras have a 10 second delay shutter release. You can hit the shutter and it will beep down 10 seconds before firing but then you kind of have to hurry and get in the area you have focused on and pose and all of that within 10 seconds and that can be a little stressful.

how do i take a picture of myself with a dslr? | Northern NJ Wedding Photographer

The absolute hardest and most challenging part of any self portrait is obtaining proper focus. Properly understanding how depth of field works helps for sure, but again, you will have to devise a strategy to achieve focus on the area you WILL BE IN before you are actually in that area. I have a couple of different strategies to do this. 

First, I increase my aperture. Attempting to shoot a self portrait at 2.0 would probably be next to impossible without hours and hours of practice and attempts. I shot all of the photos in this post at 5.0 so I would have a greater depth of field and my chances of being in focus increased greatly. 

I also use a lightstand to focus on the area I will be in since it's relatively the same height as me when I'm standing. 

A photo of my set up is below. I will have my camera on tripod, put the light stand in front of the camera in the area I want to be in in the photo and I will stand behind the camera, look through the viewfinder and use my back button focus to focus on the lightstand. Then I will move to where the light stand is and basically put my face exactly where the light stand was while grabbing it and moving it over to the side and out of the frame. 

I have a speedlite attached to the lightstand in this instance because I needed some bounce light (you can see the room is kind of dark) but it would work without anything attached as well. Just focus on the top of the light stand. 

how do i take a picture of myself with a dslr? | Northern NJ Wedding Photographer

After I feel like I am in the right place (in the plane of focus), I will pose myself how I want, then I point my remote at the camera (I usually have it set on the 2 second delay) and then the shutter will release. 

****Note- you WILL feel silly doing this. Just roll with it and have fun. ;-) 

how do i take a picture of myself with a dslr? | Northern NJ Wedding Photographer

Back Button Focus

I need to write a separate post on this, but in general I would recommend using back button focus when attempting a self portrait. If you aren't familiar with what it is, google around and you should find a good article, but the basic gist is that out of the box most DLSR shutter buttons serve TWO purposes (focus and fire) but the problem with that is that if for some reason the camera can't find focus the shutter will not release. Or if you focus and then don't fire and then you are ready to shoot the camera will attempt to find focus AGAIN which can sometimes mess up your shot. In my opinion its better to separate those two functions all together into two different buttons and this can easily be done on most DSLRs. 

If you don't not know how to switch to BBF on your camera and are attempting to take a self portrait, you might want to focus on your subject and then switch the lens to manual focus instead before firing the shutter with the remote. 

how do i take a picture of myself with a dslr? | Northern NJ Wedding Photographer

Some cameras also have a wireless built in capability (The Canon 6d does have this function) and you can actually use an app on your phone to focus your shot. I've used it a few times but it is a little clunky and difficult to manage, so for now, since I don't take a lot of self portraits, the remote works best for me. 

how do i take a picture of myself with a dslr? | Northern NJ Wedding Photographer

I hope you found this helpful and now feel more prepared to tackle attempting to take a self portrait with your DSLR. If you do end up taking one I would love for you to share a link with me in the comments so I can see your amazing work! 

As always, let me know if you have any questions at all! Shoot me an email or ask in the comments. ;-) 

photos in this post are taken with Canon 6d | 35mm Sigma Art f/1.4
Settings were 5.0 | 800 | 1/80 and flash bounced off ceiling at 1/2 power.