Understanding Depth of Field

Understanding Depth of Field | Cinnamon Wolfe Photography | NJ Wedding Photographer

If you are anything like me, understanding depth of field (DOF) was one of the biggest hurdles you had to overcome when learning the technical aspects of photography. I would read explanations online, see links to calculators, hear it described as “shallow” or “deep” and couldn’t make sense of it all.

One day it just clicked. I’m not sure where or when, but I have a much better grasp on it now.  I love using that knowledge to positively impact my own personal art as well as the art I create for my clients. My goal with this article is to explain DOF in a way that will make it “click” for you, if it hasn’t already!

Understanding Depth of Field

Explaining DOF starts with defining certain terms and moves to describing some things that affect DOF.

Definitions:

Focal Plane

distance from the camera at which the sharpest focus is attained

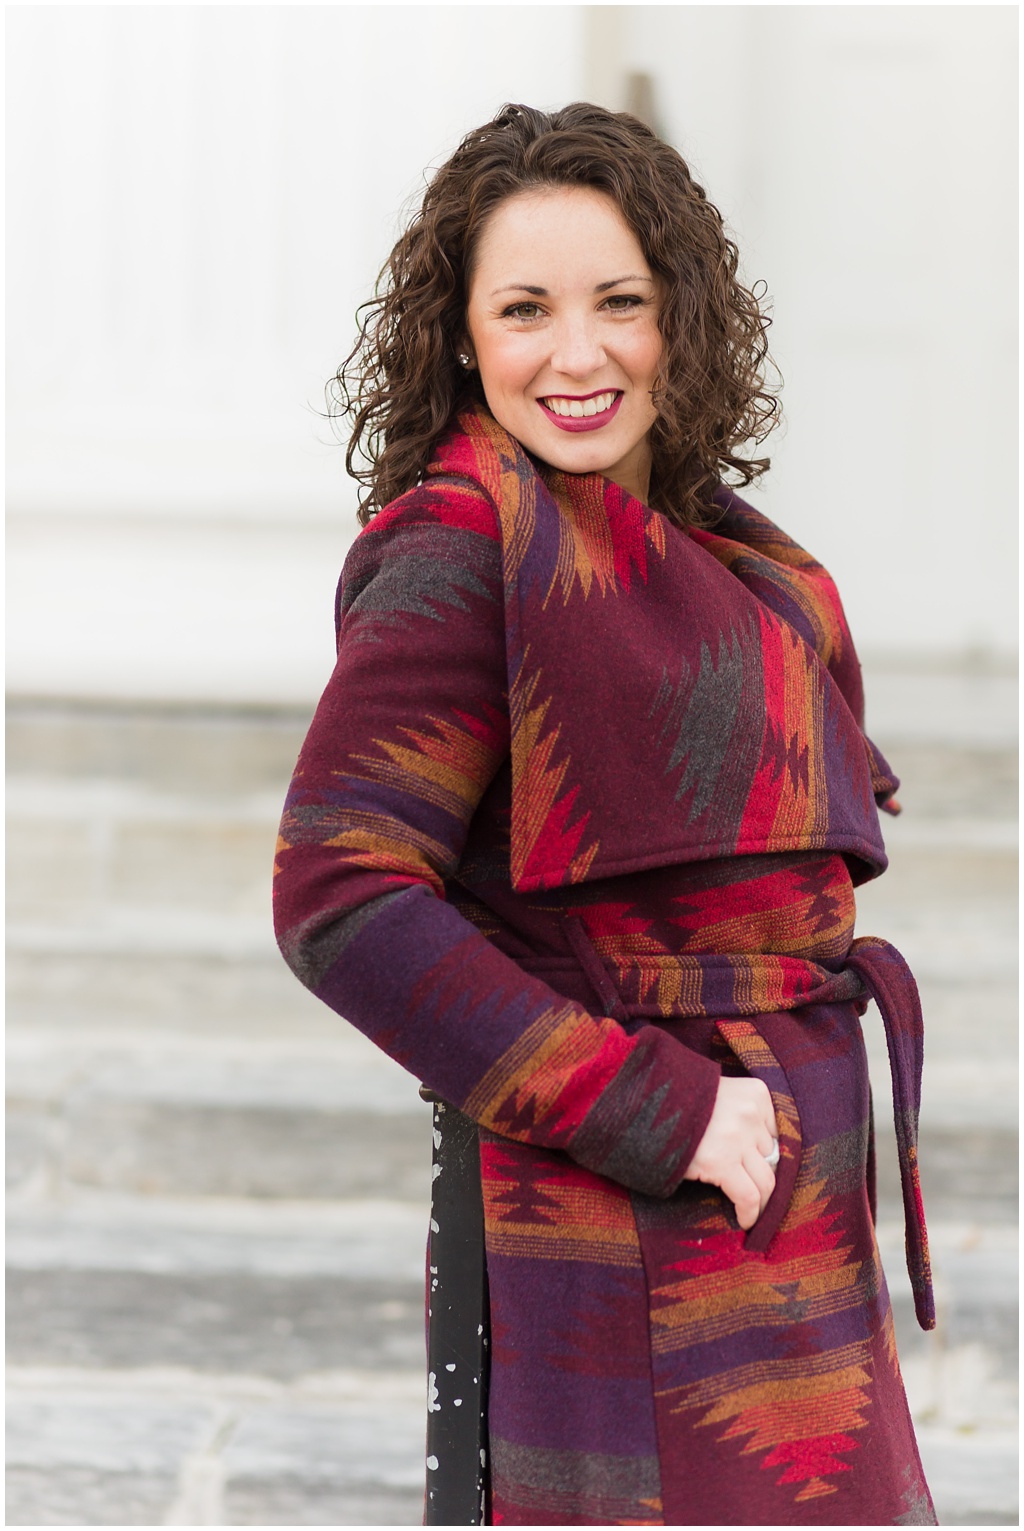
In the photo below, the exact location of the focal plane is obvious.

Understanding Depth of Field | Cinnamon Wolfe Photography | NJ Wedding Photography

Depth of Field 

range of distances on either side of the focal plane that are “acceptably sharp.” (“Acceptably sharp” is where the confusion begins.) Another way to state this would be: the area behind and in front of your focus point that is in focus as well. Even though every photograph is two-dimensional, it portrays a three-dimensional world. The distance between the camera and the subject and the distance behind the subject to the “end” of the photo is the “depth” of the photo. The amount of depth that is in focus is the depth of field.  

In the above photo, the whole “in focus” area is the depth of field.

What affects your DOF?

Aperture:

In my opinion, this has by far has the greatest impact on DOF

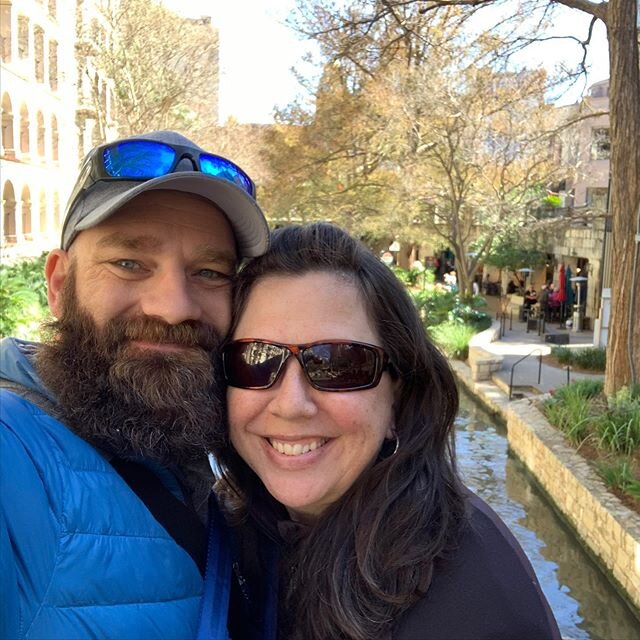
Distance from subject

How far you are standing away from what you want to focus on. Although seemingly obvious, it is easy to underestimate the effect of distance on your DOF.

Understanding Depth of Field | Cinnamon Wolfe Photography | NJ Wedding Photography

In each of the photos above, I stood increasingly farther back.  You can easily see the corresponding increasing depth of focus.

(all of the above photos were taken with my Sigma Art 35mm 1.4 at the following settings: f/1.4 | 400 | 1/200)

Focal length

Some research indicates that focal length does not affect DOF, and to an extent I agree.   But for practicality sake focal length does appear to have an effect on DOF so I will briefly discuss that here as well.  

Sensor Size

I believe this has the least impact on DOF, primarily because most photographers don’t routinely switch (alternate) between crop sensor and full frame.  Changes in DOF depend on whether you use a crop or full frame; but if you use only one sensor most of the time, it will not greatly affect your work.

Understanding how aperture affected my DOF was relatively easy for me to grasp. Standing in the same place, using the same lens, with my subject the same distance from me, it was easy to see how much of my image would be in focus if I switched between f/1.4 and f/5.6.  However, changing my distance to subject or throwing a different focal length into the mix left my head spinning.  

Here are some good examples of how changing your distance to subject can affect your DOF.

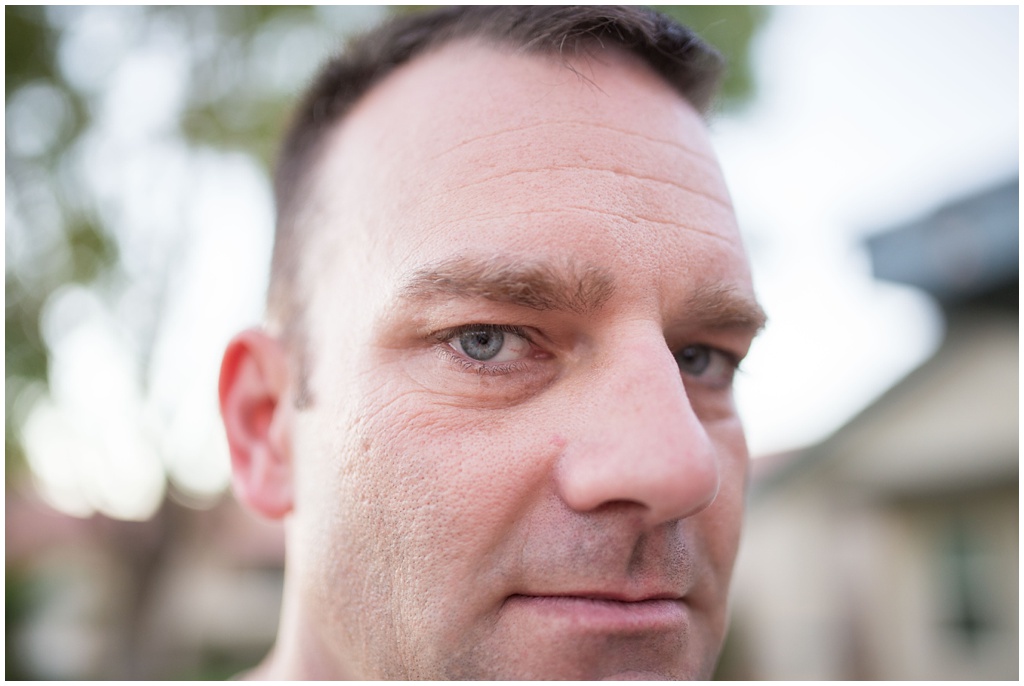
In this first photo (of my handsome, always willing-to-model-for-me husband) I moved in really close and focused on his eye. As you can clearly “see” (pun definitely intended!), his eye is the only thing in focus in this image.  That’s because I was shooting at f/1.4 while standing very close to him. Since my DOF is wafer thin and his face has a lot of “depth,” only his eye is in focus. Everything else in the photo is either in front of or behind that focus point and thus blurred.

Understanding Depth of Field | Cinnamon Wolfe Photography | NJ Wedding Photography

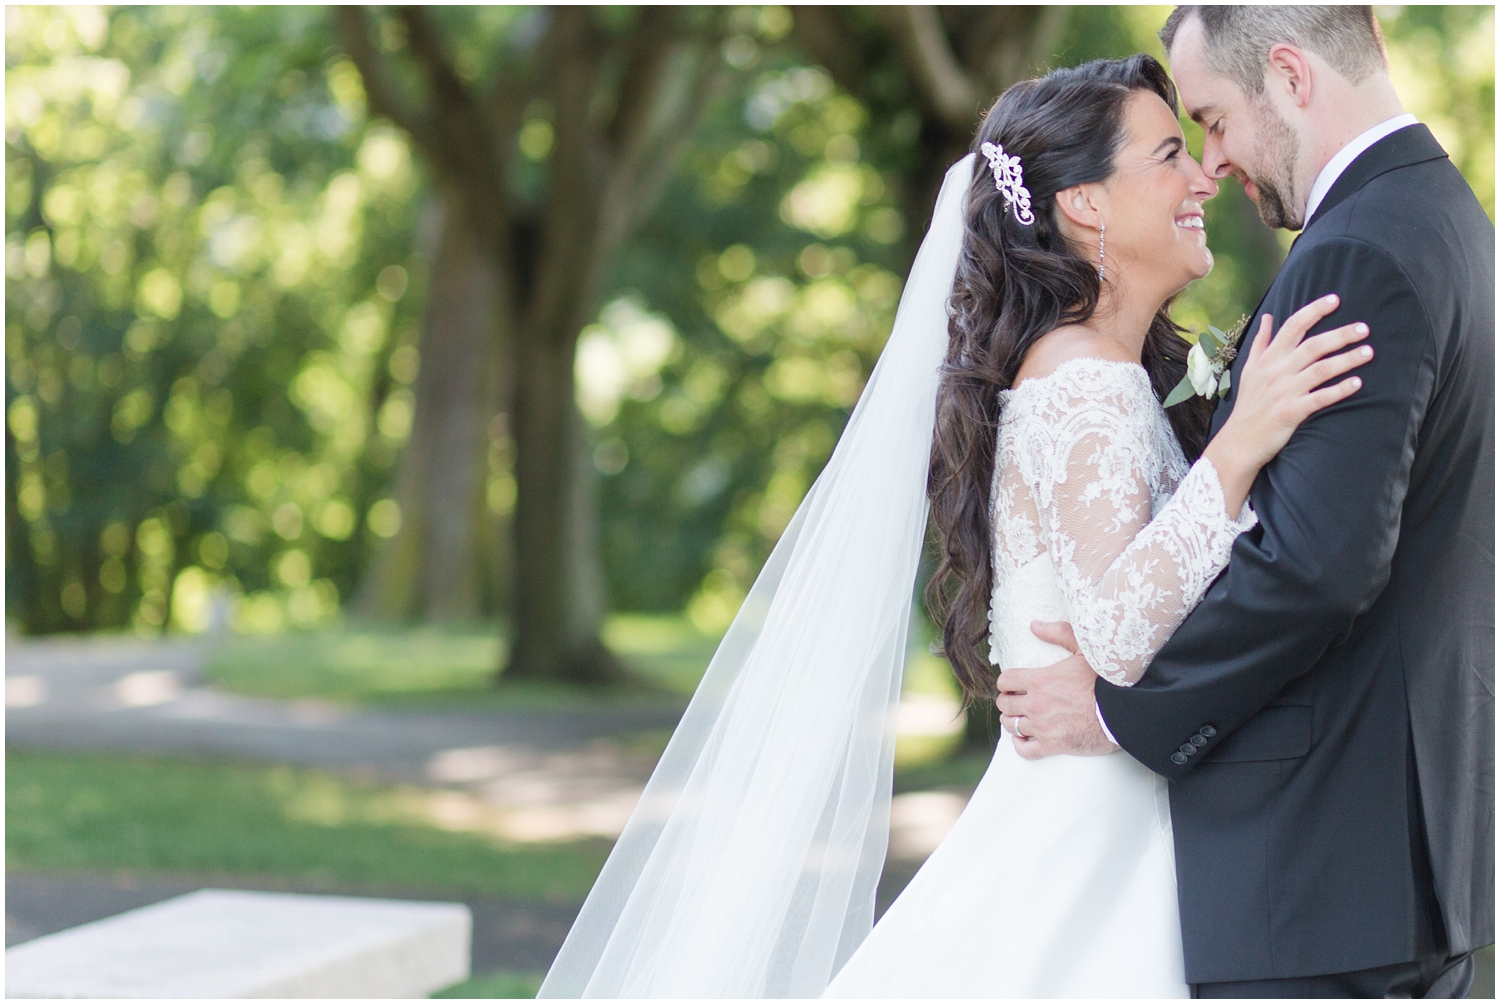
For this second image, I took two steps back and kept my camera settings essentially the same. I focused on his far eye in this image. Notice how more of the image appears in focus. However, since I had him at an angle and was shooting at such a wide aperture, my DOF is still pretty thin.  Because of the angle, his front eye is not sharply focused. Other areas, like his hair and ear and neck/shoulder line, are in focus. Those are all on the same focal plane with his eye. When looking at the photo, however, his face should be the main focus. Because of the varying depths involved and my wide aperture, the image does not appear pleasantly sharp.  If he had stood directly parallel to me, both eyes might have been in focus. If I had increased my DOF by closing my aperture to f/2.5, his whole face might have been in much sharper focus.

Understanding Depth of Field | Cinnamon Wolfe Photography | NJ Wedding Photography

For this final image I took a couple of steps back from my subject. You can readily see that my DOF is much greater at this distance. Almost all of his entire body is in really good shape (er…make that sharp) focus. The rest of the image blurs away beautifully to create a really pleasing separation of subject from background.

Understanding Depth of Field | Cinnamon Wolfe Photography | NJ Wedding Photography

I shot all of these images with my Sigma Art 35mm 1.4 lens at these settings: f/1.4 | 640 | 1/100

If I had taken the same shots, with the same settings, standing in the same places with a 50mm lens or an 85mm lens, the DOF would appear shallower (thinner) for each of the images.

Hopefully these examples have helped you unlock the mystery of DOF and create more of the images you love! 

Same location, three looks | Wide, Medium and Tight

Last week I shared the one year anniversary photos for Chris and Chelsea. During our session I also took some headshots for Chelsea for her design business

As I went through her photos, I noticed a technique that I have been working on really emerged out of the set of images. I learned this technique mostly from studying other photographers work through their blogs or online galleries and I feel that at this point it is almost becoming second nature. YAY!

How to get multiple looks from one location by shooting wide, medium and tight | Cinnamon Wolfe Photography | NJ Wedding Photographer

Posing subjects is probably one of the most difficult parts of photography (well at least for me anyway!) Knowing what makes the body look good (read Roberto Valenzuela's Picture Perfect posing for that...) and then directing someone into those positions is something that just takes time and practice. 

What I tend to do when I'm at a session and my mind goes completely blank as for what to do next, my instinct is to move locations. However, you are already in a great location, with (hopefully) great light!! Moving to another location (not to sound dramatic) puts that at risk. Varying up what you shoot in the location you are already in is a much easier way to achieve different "looks" for the client without moving much at all from the location they are in. 

Simple changes in pose, plus incorporating different perspectives in your focal length and composition can dramatically change the look of the photos and the client literally doesn't have to move their feet one inch!


In this first set of three images, I used an 85mm 1.8 (my fave for portraits) and scooted way back so I could get a full body shot of Chelsea. I had her stand a bit off of the wall to create some depth and directed her to have some separation in her legs, had her at an angle to the camera and also a bend in the elbow. 

Same location, three looks | Wide, Medium and Tight | Cinnamon Wolfe Photography | NJ Wedding Photographer

Then I got in closer, incorporated her awesomely fun hat and had her simply switch the way her body was positioned and look down to her shoulder. This was my medium shot incorporating almost all of her body, but not a full length like I had just taken.

Same location, three looks | Wide, Medium and Tight | Cinnamon Wolfe Photography | NJ Wedding Photographer

Then I got even closer and directed her again to move slightly and give me that amazingly beautiful smile of hers and got a nice tight shot of just her face with a strong rule of thirds composition. 

Same location, three looks | Wide, Medium and Tight | Cinnamon Wolfe Photography | NJ Wedding Photographer

In this next set of images, we just happened to walk by this gorgeous white door and concrete stairs and I knew we had to stop. The natural reflection of the concrete paired with the simple, elegant background of the white doors plus her delicious oxblood sweater was a match made in photography heaven! 

These were also shot with my 85mm and for the first shot I had her right in the middle of those rails for a nice, wide center composition.

Same location, three looks | Wide, Medium and Tight | Cinnamon Wolfe Photography | NJ Wedding Photographer

I moved closer again and had her pose slightly different and went in for my medium range shots from about the knee up. 

Same location, three looks | Wide, Medium and Tight | Cinnamon Wolfe Photography | NJ Wedding Photographer

And then we got that hat again and got in nice and close for a tighter shot with a lot of expression. 

Same location, three looks | Wide, Medium and Tight | Cinnamon Wolfe Photography | NJ Wedding Photographer

These last set of shots, we incorporated her beautiful jacket that she got as a recent gift for her birthday. Again, I knew that jacket against that clean background would just POP. 

I got a full body, mid length and closer shot again of her in her jacket for additional variety. 

Same location, three looks | Wide, Medium and Tight | Cinnamon Wolfe Photography | NJ Wedding Photographer

There were many more photos as well from this set of images, but I just wanted to highlight how easy it can be to get tons of choices and lots of variety without moving locations or drastically changing the pose. Simply moving your feet (if you use primes) or zooming in or out can create very different looks all from one simple pose! 

I hope you found this helpful and that if you are struggling with creating variety during your client sessions, you can use this technique to get different looks without changing things up and moving locations! 

Any questions? Let me know in the comments! I love hearing from you. ;-)